Best Practices for Exterior XPS Retrofits
Let’s get this house properly retrofitted for energy efficiency in your Massachusetts climate! You’re making a wise choice with continuous exterior XPS insulation, especially in this cold climate. Using reclaimed XPS from Green Insulation is also a great sustainable approach, reducing both costs and environmental impact. Here’s a detailed breakdown of the layers, materials, and methods I recommend, focusing on best practices for energy efficiency, moisture management, and code compliance.
Understanding the System and Goals
Before diving into layers, let’s clarify the goals and principles:
- Continuous Insulation (CI): This minimizes thermal bridging through studs, significantly improving overall wall R-value and reducing heat loss. XPS is an excellent choice for this purpose.
- Moisture Management: In a cold climate, we need to prevent interior moisture from condensing within the wall assembly while also protecting against exterior bulk water intrusion. This requires proper vapor diffusion and bulk water control.
- Air Sealing: Airtightness is crucial for energy efficiency and comfort. We want to minimize uncontrolled air leakage through the wall assembly.
- Durability: The system needs to be robust and long-lasting, resisting weather, pests, and physical damage.
- Code Compliance: Always verify local Massachusetts building codes, which are based on the International Energy Conservation Code (IECC). Specific R-value requirements will depend on your climate zone and local amendments.
Layer-by-Layer Breakdown (From OSB Outward)
Layer 1: Existing Oriented Strand Board (OSB) Sheathing
Description: This is your starting point. It provides structural support and serves as the primary base for air sealing and moisture management. We will deal with older structures with plank sheathing in a subsequent post.
Action:
- Inspection: Check for any signs of rot, damage, or delamination. Replace damaged sections as needed.
- Fastener Check: Ensure OSB is properly fastened to the studs with appropriate nails or screws.
- Clean Surface: Remove dust and debris to ensure good adhesion for tapes and future layers.
Layer 2: Air Sealing with Fluid-Applied Air Barrier
Description: A robust air barrier at the sheathing level is critical for energy efficiency. A fluid-applied air barrier ensures a seamless and long-lasting seal.
Materials:
- Fluid-applied air barrier products (e.g., Prosoco R-Guard, Henry Blueskin, or Tremco ExoAir).
- High-quality sheathing tape for additional reinforcement.
- Sealants for penetrations (polyurethane or advanced polymer caulk).
Installation:
- Seal OSB seams: Apply fluid-applied air barrier evenly across all seams and junctions.
- Seal Penetrations: Apply a thick bead of sealant around any wall penetrations (plumbing, wiring, vent openings) and use the fluid-applied barrier over the area.
- Window and Door Jambs: Ensure the air barrier extends into the rough openings to integrate with window and door flashing later.
- Bottom Plate/Foundation Junction: Apply sealant where the bottom plate meets the foundation to prevent air leakage.
Layer 3: Weather-Resistive Barrier (WRB) – Moisture Protection
Description: The WRB provides bulk water protection and a drainage plane, ensuring water sheds outward rather than soaking into the sheathing.
Materials:
- Vapor-permeable WRB (e.g., Tyvek CommercialWrap, Typar, or Henry VP100).
- WRB Tape for sealing seams and penetrations.
- Flashing Tape (Butyl or Acrylic) for window and door flashing details.
Installation:
- Install WRB Over OSB: Roll out the house wrap horizontally, starting at the bottom and working up in a shingle-lap fashion.
- Integrate With Flashing: Windows and doors should be flashed before WRB installation, ensuring water sheds away from openings.
- Seal All Seams: Tape all horizontal and vertical seams to create a continuous moisture barrier.
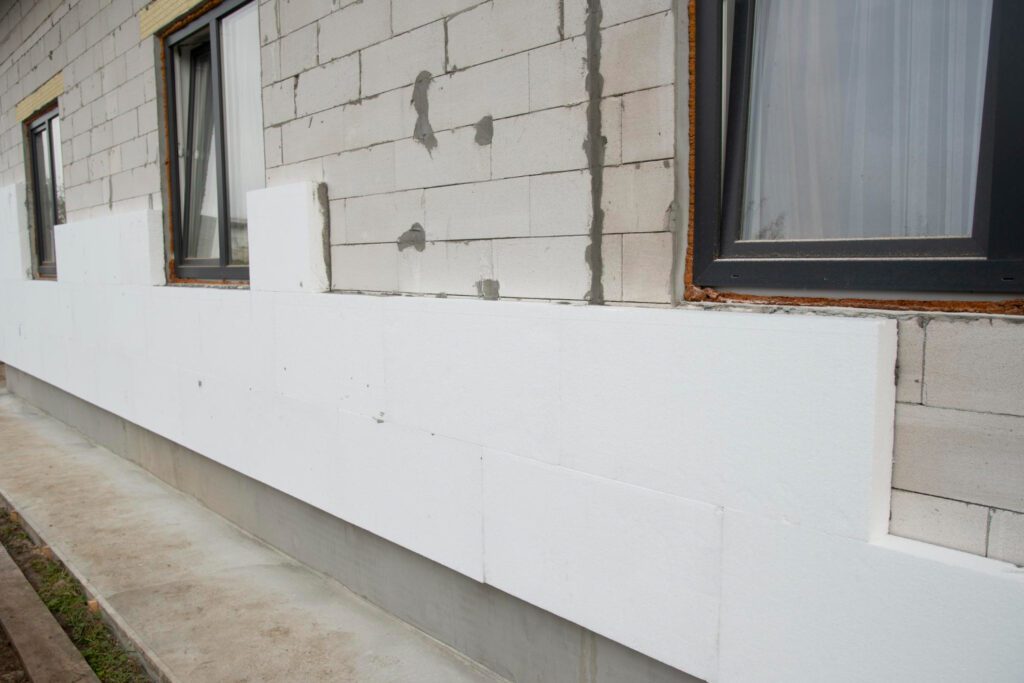
Layer 4: Continuous XPS Foam Insulation
Description: This is the heart of your energy efficiency retrofit. XPS provides excellent thermal performance and moisture resistance.
Materials:
- Reclaimed XPS foam panels from Green Insulation (R-5 per inch recommended for Massachusetts).
- Insulation fasteners with large plastic washers (cap nails or screws).
- Low-expansion spray foam for sealing small gaps.
Installation:
- Stagger Joints: Align XPS panels in a brick pattern to minimize thermal bridging.
- Tight Fit: Fill small gaps with low-expansion spray foam to maintain airtightness.
- Mechanical Attachment: Fasten XPS to studs using long screws (at least 3.5″ for 1″ XPS and 4.5″ for 2″ XPS).
- Fastener Treatment: To prevent moisture infiltration through fasteners:
- Use fluid-applied air barrier or WRB-compatible sealant over fasteners.
- Alternatively, apply small patches of butyl or acrylic flashing tape over each fastener.
Layer 5: Furring Strips – Rain Screen and Siding Attachment
Description: Furring strips create a ventilated rain screen gap, allowing the wall assembly to dry and preventing moisture accumulation behind the siding.
Materials:
- Pressure-treated 1×3 or 1×4 furring strips.
- Corrosion-resistant screws long enough to penetrate at least 1.5 inches into studs.
- Vented starter strip at the bottom and vented trim or soffit vent at the top.
Installation:
- Install Furring Strips Vertically over the XPS, spacing them 16-24 inches apart and aligning with studs.
- Secure to Studs with long screws, ensuring firm attachment without compressing the insulation.
- Maintain Continuous Ventilation: Leave gaps at the top and bottom of the wall for airflow.
Layer 6: Siding
Description: The final protective layer provides weather resistance and aesthetic appeal.
Materials:
- Choose from fiber cement, wood, vinyl, or composite siding.
- Use corrosion-resistant fasteners appropriate for the siding type.
Installation:
- Follow manufacturer guidelines for fastening and spacing.
- Maintain proper expansion gaps to accommodate temperature fluctuations.
- Ensure proper flashing integration around windows, doors, and joints.
Final Considerations for the Massachusetts Climate
- Prioritize air sealing and moisture management to prevent condensation and heat loss.
- Ensure continuous exterior insulation meets local energy code R-value requirements.
- Use reclaimed XPS from Green Insulation to save on costs and improve sustainability.
Why This Retrofit Will Pay Off
Improved Energy Efficiency: Lower heating costs and better thermal performance.
Enhanced Moisture Control: Reduced risk of mold, rot, and structural damage.
Better Indoor Air Quality: Fewer drafts and improved comfort.
Higher Home Value: Energy-efficient upgrades increase market appeal.
Sustainable Building Practices: Using reclaimed materials is an eco-friendly choice.
Get Your Reclaimed XPS Today!
For high-quality, cost-effective reclaimed XPS foam panels, contact Green Insulation—your trusted supplier in New England. Start your retrofit today and maximize both efficiency and sustainability!